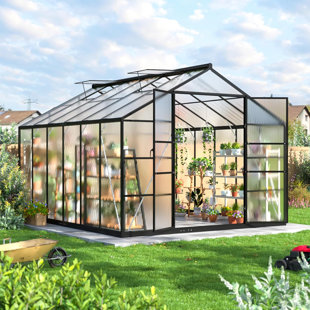
The Automatic Vent Opener was designed to automatically control the temperature in most Palram-Canopia greenhouses. As the air inside the greenhouse warms, the vent gradually opens to allow the correct amount of airflow into the greenhouse and closes when the optimal temperature is reached. The vent arm was designed with the use of natural wax that expands to push a piston, which raises the window, as the air gets warmer then contracts as it cools, closing with the use of a spring. The Automatic Vent Opener operates without the use of electricity.
- Product Type: Vent or Shutter
- Material: Metal
- Outdoor Use: Yes
Got the wonderful Mythos 6 x 8 by Palram and just finished the major installation this weekend over four days of 3-4 hour days. Great engineering.
Prior to installation I reviewed the instructions, and read a lot of reviews including comments on the installation.
Some tips:
Purchase a 10 mm socket for a battery operated screwdriver. There are bazillions of screws of that size in this project, and your drill with this bit is too powerful. (And no, your socket set in ‘American’ units won’t do). Occasionally you’ll need a Phillips head bit. Silicone spray makes getting the rubber weather stripping into their channels a breeze.
Unpack everything (except the panels), and inventory and organize it. Fiddling around trying to find a specific part will slow your roll and take your energy. I put the nuts/screws in separate plastic cups labelled with a sharpie, sorted the metal pieces by number in my garage/basement, and put all the plastic bits in a shoebox. Lifesaver.
Pay attention to the images on the instructions and take your time (you can download the PDF before your greenhouse arrives and commence your study). When you start becoming confused or fatigued, give it a break. The instructions are complete, but very very specific. If it’s not working/fitting, you are doing something wrong (user error). Take a break, and then look at the instructions more carefully, Use your reading glasses; all the secrets are printed there. Be calm and patient.
A few installers remarked how they assembled it solo; they need a reward. Two people was optimal, at times we had a third, and set her to assembling the door. Assemble the door on a work bench or table — it’s a big job (made even worse if you decide to reverse the swing like we did — take your time). There are pieces you can do solo (the base up to raising the walls, the door, the gables, the roof vent construction); the rest works better with 2 sets of hands.
If you decide to get the louvered panel accessory (highly recommended for air flow) , the instructions assume that you’re deconstructing an already built greenhouse. Study the plans carefully and install it during the greenhouse initial construction (partially a reason my construction took so long). Also, get the automatic opener for the ceiling vent, and don’t bother with the included plastic opener— you’ll likely never be home when the greenhouse needs venting for heat (hint- put it in the fridge so the it’s ready to install when you want it). The other accessories I got are the lover opener (installing today) and both the heavy duty and light shelves. For planning your layout , note that the light shelves cannot be placed in the corners.
Only build when it’s still; gusty winds will drive you bananas. Check your weather app and search for two back to back days of calm and mild weather.
Best wishes on your journey— you’ll be pleased to have gotten this greenhouse.. Pat. VA. 2020-11-22 12:31:17